

The Vélib bike system in Paris and how to use it.

UPDATED APRIL 2025
My friend Huey (pictured above) helped me figure out the Velib bike situation. The Vélib is the biggest bike sharing system in the world. I remember watching Vélib users but we never managed to figure out how to do it, so we walked or took the Métro. But using a bicycle has its merits:
You see more.
You don’t have to wind your way down to the Métro and wind your way back up. Especially if you’re not going too far.
You can avoid certain smell stations. (I’m looking at you Place d’Italie.
Huey was determined, so after half a day of sweating through Franglish with locals, he figured it out and shared his findings. Then we tooted around Paris for the day. I discovered that the Vélib is the best way to get around Paris. I can't believe how much I abused my feet before.

Look at this beige on beige loveliness.
When you come to Paris, here's the trick to Vélib:
1. The touchpads near the bikes often don’t work. Or they are finicky. You will have to input a lot of information (name, email, password, blah blah blah) and it’s way easier to do that on your phone or computer at home. Plus, if you’re distracted at the kiosk, pickpockets can pick your pockets. Hey, it happens. They watch for you.
2. Go to the website to sign up BEFORE you go out to the bikes. That's the first trick, see. There is no card that spits out of the Vélib kiosk. It’s not a vending machine. This isn’t the olden days. They have an english sign up page so don’t sweat it.
3. Choose the Tickets option. A subscription is for locals. You need a local address for that one:

2. Choose your option. The cheapest option (Ticket-V) is too stressful. You are going to need to do this a few times to get hang of it as well as the full joy of the Vélib. I suggest the 24-hour pass or 3-day pass. The Electric option below (see question mark) seems fine I suppose but if you’re in Paris for a week, but why not splurge on the 3-day pass, which is cheaper if you will use it for 3 days. You’ll probably like it enough to use it after your 24 hours. Trust me on this.
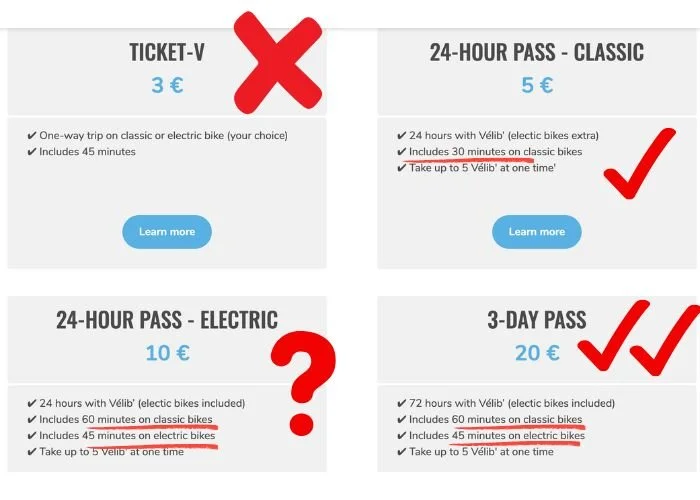
3. Choose the number of bikes you’re wanting to rent over the course of your stay in Paris. Note above that you can take up to 5 Vélibs at one time with your passes so unless you are with a big crowd, you won’t need so many passes.

4. Fill out all the information:

THIS IS WHY YOU DO THIS AT HOME and not at the kiosk. Look at all this typing. You really want to do this at the kiosk? And remember, the touchscreens are typically touchy. Do this BEFORE you head to the kiosk. You can even sit at a café nearby and type all this out on your phone. That’s fine.
5. Provide your phone number. You’ll have to choose your country first, then add your phone number without the country code. The US and Canada code is 1 so don’t add 1, then your number. The 1 will be on the dropdown menu:

6. Don’t freak out:

A deposit will be charged on your credit card. Don’t freak out! It’s temporary and will not be a permanent thing you pay for unless you toss your bike in the Seine. Pro tip: Do not toss your bike in the Seine.
7. Once you click “Pay by bank card”, you will receive your ACCESS CODE and PIN. Write this down. Take a screenshot. Remember it. You’ll need it at the bike.

8. Approach the Vélib bike with confidence. BEFORE you start adding your ACCESS CODE and PIN, pick a bike that has good tire pressure, not too many dings and a seat that is already adjusted to your level. You can adjust it yourself but you've got enough to think about on your first bike trip. Or adjust it before you start plugging in your numbers.

5. Type in your ACCESS NUMBER and PIN. Notice that this is much easier than typing all that sign up stuff at the kiosk touch screen. The bike will unlock after your successful inputting of said numbers. NOTE: There is no card you'll receive. That is for the SUBSCRIBER people. Locals. You are not a local. Don’t be alarmed by the photo of the hand and card. This is not for you. Local people can add Vélib to their monthly Métro subscription. These people are cool and confident. You'll be slightly jealous that they have a card and you have just a number.
6. Release your bike. It will slip out of the magnetic lock thingy. This is when you'll want to do a dance of joy but you can't because you're holding a bike.
7. Ride your bike. The trick is to ride the bike for 25 minutes, then take 5 minutes to find and park it at another Vélib station. (Or the equivalent for the 45 or 60 minute versions of your pass). If you are not yet at your destination, grab another bike from a Vélib station and continue on. Or park your bike in the magnetic thingy, then sign the same bike out again. If you wanted to ride from the 5th to the Eiffel Tower, it would take two or three bike swaps.
NOTE: You will easily find a kiosk. There are 20,000 bikes sitting at 1,800 bike stations located 300 meters apart. You’ll likely find another station before you have to start looking for one. The ones closest to big touristy sites are the busiest.
ANOTHER NOTE: You're not being stealthy by riding for 30 minutes then doing a bike swap. It’s meant to be a temporary thrill.
On my first day with the bike, I stopped at a mosque for tea. Parked the bike.
Took another bike to the Bastille area to find a place to eat. Parked the bike.
Took yet another bike to the Marais. Parked the bike.
The best part of the Vélib is that you never have to go back to anywhere to retrieve it.
Wherever you go, you can find another bike. It's actually better than having your own bike because you'll never have to retrieve it or worry about it being lost or stolen. Though you do need to have your wits about you when typing in your ACCESS CODE and PIN.
You'll find that touring around on the bike is a nice way to see a lot of the city in a short amount of time. You might even start to feel like a local.
Bienvenue à Paris!
PS I want to send you a letter in the mail. Join my new mail club, Cottage Letters. It’s like a sequel to my Paris Letters. It includes original art in every letter. GET $5 OFF all orders over $49. Use code FIVERFOREVA.

This was the August Cottage Letter. Includes blueberries!